


Standing at a height of 2999m, Mount Tsurugi is not the top ten highest mountain in Japan. However, it is definitely one of the most revered within the Japanese mountaineering community.
To every Japanese hiker, conquering Mount Tsurugi is the ultimate challenge. This is the mountain to boost of your skills and experience. Among the one hundred most famous mountains in Japan, it is considered as the hardest one to climb due to its narrow and rocky terrain, the need to use chains and ladders and the traverse or climb with exposure. It has earned some pretty scary nicknames such as the 'Mountain of Trial and Admiration' and the 'Palace of Rock and Snow'.
In addition to the terrain, the mountain is located within 30km from the Sea of Japan, thus bringing in high volume of snow in the winter, typhoons in the summer and generally unpredictable weather throughout the year. For safety reason, there is even an unofficial turnaround time of 2pm, similar to Mount Everest!
The Climb Up - To the Mountain Hut via Mount Tate
Our journey was supposed to be somewhat chilled. We were planning the following three-day itinerary:
- 1st day - Hike from Murodo to the three peaks of Mount Tate (Fuji no Oritateyama, Oyama and Onanjiyama); then head to the mountain hut Tsurugi-sawa Koya (~5 hours);
- 2nd day - Roundtrip from the mountain hut to Mount Tsurugi (~6 hours);
- 3rd day - Return to Murodo (~3 hours)
However, a typhoon hit Japan a few days before our trip, therefore we had to cram the second and third day into one day. What's more, it was raining cats and dogs on our first day! Due to the bad weather, I could not recall much of the hike to Mount Tate. I remember it being windy and cold with no view at all. Thankfully we were in high spirits, laughing our way through the rain. Towards the end of the day, we were so cold that we were reluctant to leave the heater room in the mountain hut! The climb to Mount Fuji is still the coldest night in my life but this comes pretty close. In short, it was a rather rocky start.
The route from Murodo to Mount Tate is suitable for beginners with proper hiking gear. It takes ~3 hours for a roundtrip and can be done as a day-hike. The elevation gain is ~600m from 2420m to 3015m, thus it is not too strenuous of a climb.
Starting from Murodo, head towards the mountain hut Ichinokoshi, which would take ~1 hour. The trail is mostly groomed with clear post-signs along the way. It can get crowded during the summer and autumn season so I would recommend an early start. The real climb starts from the mountain hut, requiring you to zigzag your way up a rocky slope for ~1 hour before reaching Oyama: the most famous peak of Mount Tate.
Being one of the three holy mountains in Japan, there is a small shrine at Oyama that you could pay a fee of 500 yen to visit. There is also a small shop for you to buy souvenirs.
After Oyama, you can continue along the ridge for ~20 minutes to reach Onanjiyama before heading back to Murodo. Alternatively, you can continue north towards Mount Tsurugi. If the weather gives, you should be able to see Mount Fuji and Mount Yari during your climb.
The hike from Mount Tate to Mount Tsurugi takes ~3 hours. It is not difficult as long as you stick to the designated path.
The Climb Up - To Mount Tsurugi
Thankfully we had a good night to recover! Most of us went for the more luxurious accommodation: the mountain hut instead of the tent. We got to dry off everything in the heating room. I took a SHOWER, which I did not think was possible as water is a precious commodity high up in the mountain. We also had the whole place to ourselves, thus spacious sleeping quarter and no smelly feet right next to my face :).
The mountain huts near Mount Tsurugi are usually packed. It was a rare exception in our case for the reasons that: 1) the weather forecast did not look promising; 2) it was the last night before the mountain hut closed for the season. Note that this made the climb more risky: if we were to run into any issues, the mountain hut would not be able to offer any assistance.
The next day was such a contrast to the previous day. We woke up to the perfect weather for summiting: sunny, superb visibility and low wind speed. I will always remember starting the hike in the dark; getting nervous while paying attention to the path ahead when suddenly, I was greeted with a perfect egg-yolk sunrise peeking its head above the sea of clouds. As we ascended and looked back, we were mesmerised by the splendid view of the mountain, which was tainted with a warm hue from the morning sun. The challenge ahead did not seem to matter so much anymore as we frantically snapped a few photos before the magic disappeared.
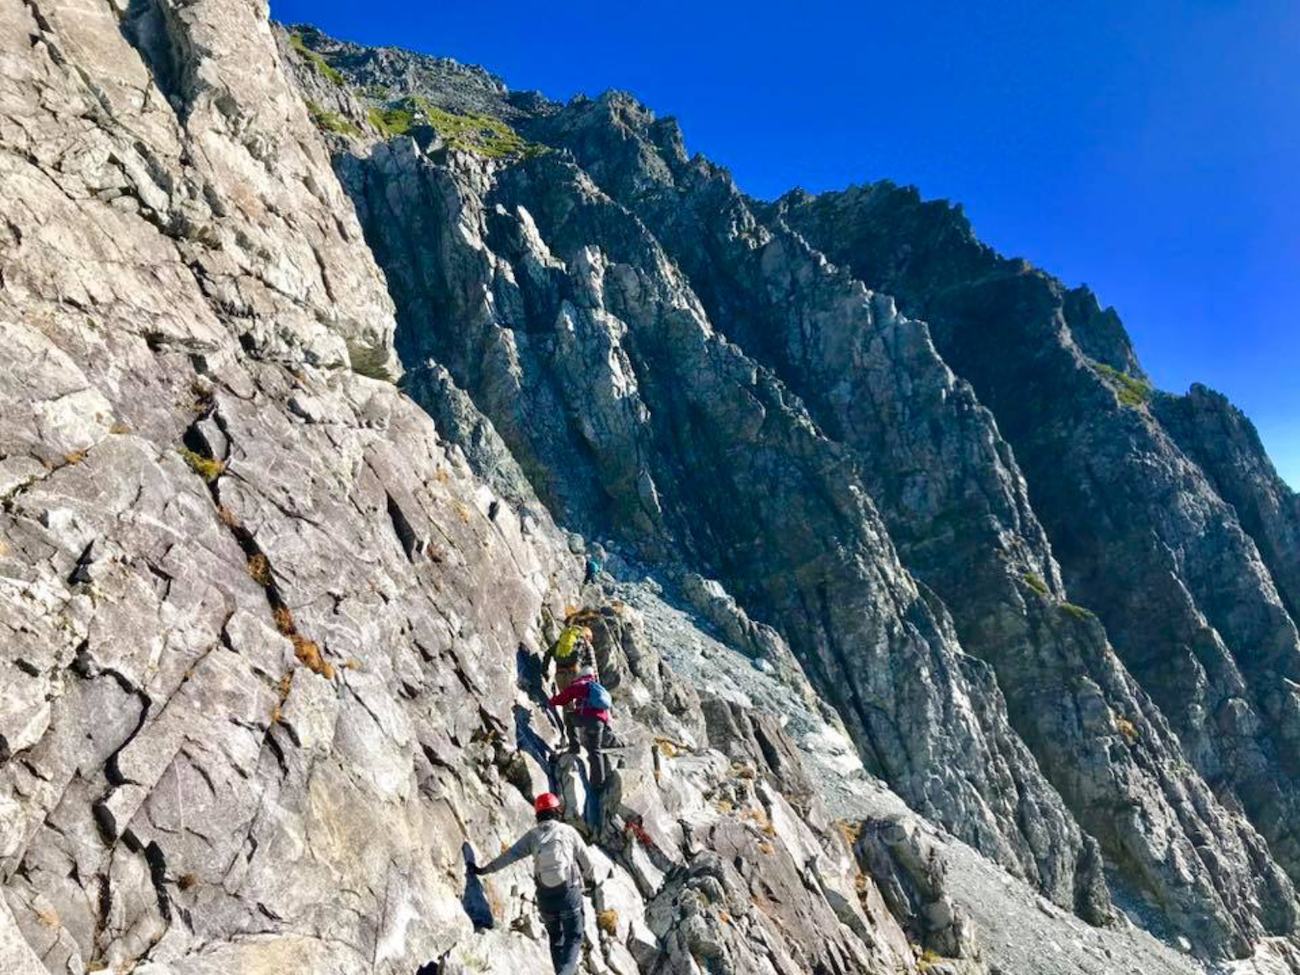
We took the most accessed route from the mountain hut Kenzan-sou to the fake summits (i.e. Ippuku Tsurugi and Mae Tsurugi) then Mount Tsurugi, which is ~3 hours one way. The route from the mountain hut to Mae Tsurugi is rocky and steep, but not particularly exposed. There are chains that you could use, but you can get by without them for most of the way. The only thing to note is that there are many loose stones, so be mindful of sending them towards the hikers behind you. I would recommend wearing a helmet to protect yourself as well.
The fun starts after passing the fake summits! Immediately after Mae Tsurugi, we faced the first one of many obstacles: a rudimentary, narrow bridge connecting to a cliff side ascent with a ~2000m drop on the right. If you were to make a mistake here, you would plummet down towards the sea of Japan. I would consider this as the point of no return as the route ahead split into two: ascent and descent only, thus you could not turn back that easily. Personally I did not find it to be too intimidating. I took it slow; maintained the three-point contact rule and focused on my footing at all times. There are also sturdy footholds along the way so all is good if you take it steady.


The route returns to normal for a while until you reach Heizo no Zuko, where you would have to climb up a short distance before descending down to Heizo Col. The descent is frightening: it looks like a bumpy slide aka another express highway towards the sea of Japan. Thankfully, this section is one-way only so you would not have to worry about giving way to others.
The next obstacle is right around the corner: the famous Kani no Tatebai (i.e. crawl up like a crab)! Along with Kani no Yokobai (i.e. crawl sideway like a crab), the two sections are regarded as the most dangerous, or most exhilarating, parts of the climb. The first Kani involves scrambling up vertically for ~50m, using chains, ladders and metal footholds. If you have bouldering experience, this should not be a problem for you. I found this section okay as I am well versed in climbing upwards. Again I would suggest to take it slow; maintain the three-point contact rule; do not look down; do not rely on the chains too much and keep your body close to the rocks. Note that there could be a queue during the weekends and public holidays, in which the wait could be up to 1 hour! I would hate to wait there for such a long time, stranded on a rock with the exposure, thus I would advise starting your climb early, or come on a weekday to avoid the queue.

It is a relatively short hike up from Kani no Tatebai to the summit. I was relieved to have finally made it! The view on the top is breathtaking: 360-degree view of the Japanese Northern Alps, including Mount Tateyama, Mount Yari and Mount Hotaka. There is a small shrine at the summit for you to pay your respect, as well as signs for photo-taking. We took many photos and had our second breakfast before starting our descend.
Just when I thought it would be a relatively easy way down... We were forgetting about the biggest obstacle of the day: Kani no Yokobai (i.e. crawl sideway like a crab). The second Kani requires you hugging a cliff, with cracks in the cliff face as your footholds, while dangling on a chain to protect you from taking another highway 2000m down. Note that the dangling part is only available if you have a harness, otherwise you would hold onto the chain for dear life as you stretch your leg to reach the next crack and continue moving sideway. I would say that this was way beyond my comfort level. At the time, I truly believed that if I were to make a mistake, I would have ended my life there. The realisation that I was so close to death brought a sense of clarity and high that I have never experienced before. Nothing came close to how I felt that morning. The first step was particularly nerve-wracking: it seemed that there was nothing at the cliff face for my foot to step on! Most probably because I have short legs... It was a leap of faith dangling my leg down the cliff, searching frantically for the foothold. Thankfully, I have the best team mates supporting me along the way, pointing out where to put my foot next. I wouldn't be able to make it without them! My biggest advice is that you should check whether there is a queue before making a start. It would be hell if you are stuck halfway through!

There is a short descend with ladders and chains after the second Kani, then back to Heizo no Zuko via a slightly different route. This should take you back to Mae Tsurugi, i.e. safety! The rest of the hike to the mountain hut should be relatively straight forward.
My Personal Highlights
The climb itself is a key highlight! It was varied; exciting and at times overly stimulating: the definition of a big adventure. You do not get many opportunities to hang off a cliff with your life on the line! What's more, the view along the route and on the top is stunning. My adrenaline was rushing but I did manage to stop; observe and take it all in, especially during sunrise when the mountain lit up as if it were on fire. It was strangely therapeutic to be in such a beautiful yet dangerous place.
Others include: 1) the weather turning from the worst to perfect! We were graced with an unobstructed view of the mountains; 2) getting to take a shower at the mountain hut; 3) purchasing The North Face x Mount Tsurugi T-shirt as a souvenir.
As mentioned in my previous post on hiking from Kamikochi to Karasawa, I would definitely recommend the usual activities (i.e. sunrise; sunset and stargazing). I found sunset to be not as pretty as sunrise though.
Tips
- Do not attempt Mount Tsurugi if you are afraid of heights! If you must, bring a harness with you
- Do not attempt this hike if you do not have proper hiking gear and / or experience with scrambling, climbing, exposure etc. This is considered as the hardest conventional hike in Japan. It is not a mountain that you would want to underestimate
- Start the climb early or come on a weekday. There are two sections that usually require ~1 hour of queueing during the weekends and public holidays (i.e. Kani no Yakobai and Kani no Tatebai)
- Aim to finish your climb at 3pm latest. You do not want to be stuck there in the dark
- Wear a helmet. You can bring your own or rent it for ~500yen at the mountain hut
- All of the tips mentioned in my previous post on hiking from Kamikochi to Karasawa apply here as well
- Consider staying at the mountain hut to conserve your energy for the climb, or take advantage of their facilities
- Visit the mountain hut for some iced cold beer!
Facilities at the Basecamp
- Tsurugi-sawa Koya - Mountain hut #1. They have vending machines; heating room; shower rooms and shop selling drinks, light food and souvenirs. You can also rent a helmet on a per day basis.
- Kanzan-So - Mountain hut #2. The closest mountain hut to Mount Tsurugi. It has similar facilities as Tsurugi-sawa Koya.
- Campsite - Situated between the two mountain huts. Register and pay for your camping fee at the management building before setting up your tent. You can use their toilet and get drinking tap water from the basins outside.
Route
- Direct route - Murodo -> Raichou-sawa (~1 hour) -> mountain hut Bessan-nokokoshi (~2 hours) -> mountain hut Kanzou-so / Tsurugi-sawa Koya (~1 hour) -> Mae Tsurugi (~30 - 40 minutes) -> Mount Tsurugi (40 minutes). More information is available here
- Indirect route via Mount Tate - Murodo -> mountain hut Ichinokoshi (~1 hour) -> Mount Tateyama, including Oyama and Onanjiyama (~1 hour and 20 minutes) -> Kanzou-so mountain hut / Tsurugi-sawa Koya mountain hut (~3 hours) -> Mae Tsurugi (~30 - 40 minutes) -> Mount Tsurugi (40 minutes). More information is available here
Where to from Mount Tsurugi?
- Mount Tate (or more commonly known as Tateyama) - At 3015m, it is one of the three holy mountains in Japan along with Mount Fuji and Mount Haku. Since it is on the way from Murodo to the campsite and verse versa, I would recommend pocketing the peaks on your first day or last day
Recommended Plan
- Relaxed itinerary - Three days two nights trip. First day: Hike from Murodo to the campsite or mountain hut. Second day: Hike from the campsite or mountain hut to Mount Tsurugi and return. Third day: Hike from the campsite or mountain hut to Murodo
- Peak pocketing itinerary - Three days two nights trip. First day: Hike from Murodo to Mount Tate, then to the campsite or mountain hut. Second day: Hike from the campsite or mountain hut to Mount Tsurugi and return. Third day: Hike from the campsite or mountain hut to Murodo. Note that you can hike to Mount Tate on your return leg instead
- There are other routes that you could explore, with most tailored for advanced hikers. More information is available here
Access
- Via Tateyama Kurobe Alpine Route - A famous mountain sightseeing route in the Toyama region, composing of seven different transportation services, namely bus, funicular, trolleybus, aerial tramway and walking. If you are considering taking the same route back, check the bus timetable in advance such that you do not miss the last bus of the day. More information is available here
